DopplerPad
User Guide
Looking for hands-on examples?
Check out our Tutorial Videos
Check out our Tutorial Videos
Table of Contents
Welcome to DopplerPad
Quickly create and perform musical hooks, phrases and loops with a variety of custom synth and sample-based instruments. Make samples on the fly and weave them into compositions.
DopplerPad is an expressive touch instrument designed exclusively for iPhone & iPod Touch. Use rhythmic and melodic automation to create phrases by freely moving fingers around the musical touchpad.
Drags and taps come to life with responsive visual feedback, making the groove visible.
Screen Views
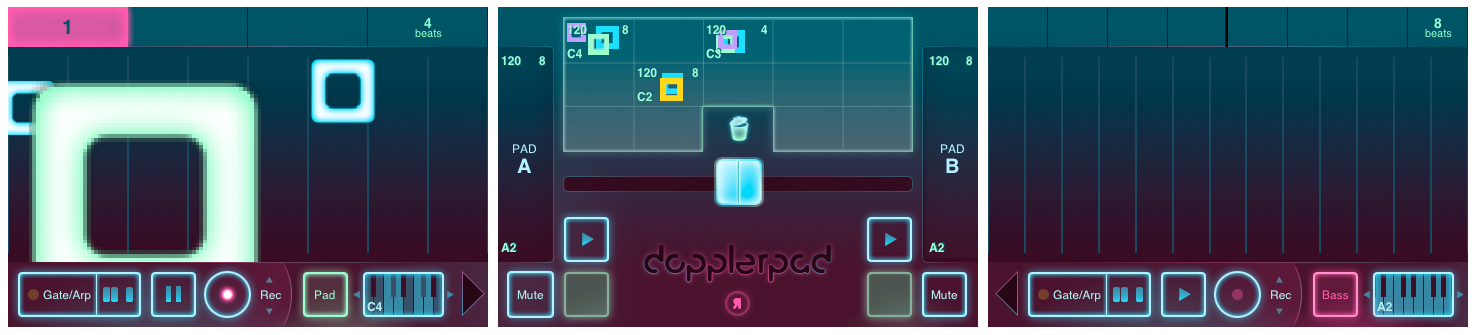
DopplerPad has three main screens: two musical touchpads on either side of a mixer. Imagine the classic DJ set-up with two turntables and a mixer in the middle. DopplerPad opens to the mixer, and tap Pad A or Pad B to view the touchpads.
Musical Touchpads

Pad A and Pad B provide instruments and tools to construct solos, loops, and phrases.
Playing the Touchpad
Drag and tap the large center area to create sounds and visuals. The horizontal and vertical axes control various sound parameters (e.g. slide left to right to change pitch, slide up and down to modify a filter).
The velocity at which you tap the device controls the volume of the note you're playing.
Velocity is like pressing a piano key harder or softer to play louder or quieter notes.
Using Instruments
DopplerPad has 6 classes of instruments: Bass, Drums, FX, Lead, Pad and Sampler, each with a designated color.
Selecting Instruments

To show or hide the Instrument Menu, tap the button labeled with the current instrument class. Swipe the menu to browse instruments, and tap to select.
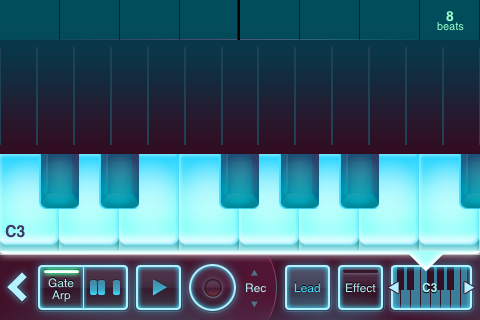
Pitch-Based Instruments
When playing pitch-based Instruments, the horizontal axis of the touchpad controls pitch, and the vertical axis controls a parameter such as a filter. Notes are delineated by vertical bars on the touchpad.
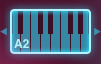
The touchpad has a one-octave range. Swipe the Octave Control to the left or right to change the current octave. Each swipe shifts one full octave up or down from the current position.
The Octave Control displays the starting note of the scale and octave number in the lower left corner.
Changing the octave while playing a note will change it
Drum Kits
Drum Kits control several different sounds on the touchpad. When a Drum Kit is selected, the touchpad displays a grid, and each cell triggers a different sound from the kit.
Samplers
After selecting a Sampler, a Sample button appears in place of the Octave Control. Tap the Sample button to start recording using the phone's microphone (or an external microphone if attached).
If you have an iPod Touch, you need to plug an external microphone into the headphones jack to record samples.
After recording a sample, a waveform of the audio shows on the screen. Tap anywhere on the waveform to start playing from that position in the sample.
Each Sampler retains its recording until you make a new sample.
Using Effects
Effects are a handy way to modify existing or custom sounds and give them an added layer of complexity and richness. There are several built-in factory effects; each effect can be applied to any instrument or sample.
Selecting an Effect
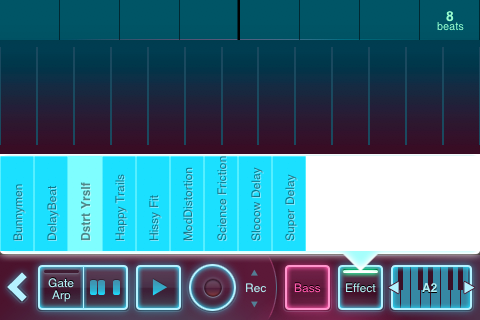
To show or hide the Effects Menu, tap the button labeled "Effect." Tap to enable a particular effect from the menu, and the button will be illuminated along with the current selection in the menu. Tapping the effect name again in the menu will deactivate it, turning off any effect, and the button will reflect this off state.
Editing Scales
Use the Scale Editor to create layered loops, phrases, and arpeggios that stay in key. The default scale is a chromatic scale (all 13 notes) from left to right.
To show or hide the Scale Editor, tap the Octave Control. Tap an enabled piano key to disable it, and vise-versa. Disabled keys appear greyed-out and aren't available notes on the touchpad. This is reflected in the number of vertical lines on the touchpad.
Scale Editor with Disabled Keys
Change the starting note of the scale by swiping the Scale Editor right or left. The starting note and octave number are displayed in the corner.
Some useful scales (key of C):
| Ionian |

|
| Dorian |

|
| Phrygian |

|
| Lydian |

|
| Mixolydian |

|
| Aeolian |

|
| Locrian |

|
| Major Blues |

|
| Minor Blues |

|
| Diminish |

|
| Combination Diminish |

|
| Major Pentatonic |

|
| Minor Pentatonic |

|
| Raga Bhairav |

|
| Raga Gamanasrama |

|
| Raga Todi |

|
| Spanish Scale |

|
| Gypsy Scale |

|
| Arabian Scale |

|
| Egyptian Scale |

|
| Hawaiian Scale |

|
| Bali Island Pelog |

|
| Japanese Miyakobushi |

|
| Ryukyu Scale |

|
| Wholetone |

|
| Minor 3rd Interval |

|
| 3rd Interval |

|
| 4th Interval |

|
| 5th Interval |

|
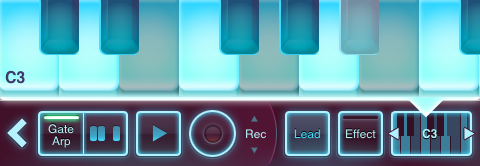
Using the Gate/Arpeggiator
The Gate/Arp Control is a groove and rhythm tool. It creates complex rhythmic phrases that sync to the tempo.
Gate/Arp patterns are 4 beats (1 bar) long and subject to the loop's tempo. When the Gate/Arp is on, any sounds played on the touchpad are limited to the Gate/Arp pattern. Play the pattern by holding your finger down on the touchpad.
Enabling Gate/Arp
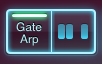
Tap the Gate/Arp button to enable or disable gating. When enabled, the yellow light is lit.
You can enable and disable the Gate/Arp while holding notes.
Editing the Gate/Arp Pattern
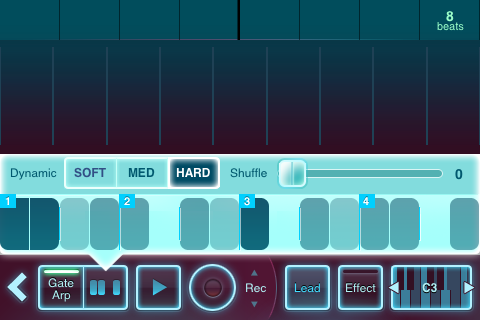
The Gate/Arp Editor is to the right of the Gate/Arp enable/disable button. Tap it to show or hide the Gate/Arp Editor.
The numbered vertical bars represent one beat. Tap to create short notes; tap and drag to create long notes. Tap to remove notes, or tap and drag to erase a section. Adjust the intensity of each note's dynamic by selecting Soft, Med or Hard before adding notes to the pattern.
Sliding the shuffle node to the right will increase the amount of rhythmic syncopation added to the pattern during playback; the higher the shuffle, the more pronounced the syncopation.
You can edit the pattern while holding a note.
Loops & Recording
Loop Timeline

Across the top of the touchpad is the Loop Timeline, which is divided into beats and bars and displays the number of beats in the loop.
When a loop plays, a green block progresses from left to right, indicating the current beat.
Loop Menu
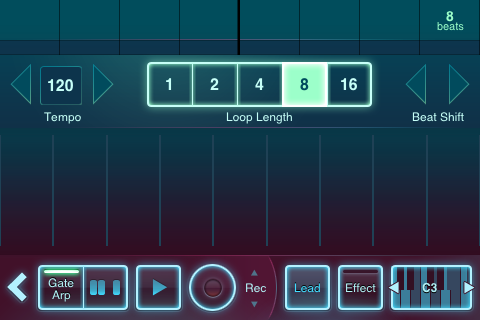
Tap the Loop Timeline to show or hide the Loop Menu.
Controlling Tempo
Tempo, measured in BPM (Beats Per Minute), affects the speed at which loops record and Gate/Arp patterns play. To change the tempo, tap and hold the arrow to the left or right of the current tempo.
Once you've made a loop, changing the tempo will not change the playback speed of what you recorded.
Controlling Loop Length
Loops can be set to 1, 2, 4, 8 or 16 beats by tapping the corresponding button.
Beat Shift
Beat shift is an easy way to synchronize the current touchpad with the other pad. Tapping the arrows left or right will snap the current touchpad's playback backward or forward, allowing you to more easily synchronize when pads are playing simultaneously at the same tempo.
Change the Loop Length on existing loops for fun effects.
Recording a Loop

Record Control: <Rec> Mode

Record Control: <Clear> Mode
The Record Control records loops in two different modes. Switch modes by tapping <Rec> or <Clear>.
<Rec> Mode:
Tap the round button while <Rec> is displayed to start recording. Recording continues until the round button is tapped again.
Recording in this mode adds anything you play to the loop, even when audio is already recorded.
<Clear> Mode:
Tap and hold the round button while <Clear> is displayed to clear or replace parts of the loop. While you hold the button, the existing recorded audio will be deleted. This will stop as soon as you release the button.
In <Clear> mode, anything played is recorded, but the new audio replaces the existing loop for as long as you hold the button.
Clear out bits of a loop to create interesting rhythmic variations.
Playing Loops

Tap the Play Control to play or stop a loop.
If a loop is playing on the other touchpad, playing the current touchpad will automatically sync to the "nearest beat" so both stay in step.
Mixer
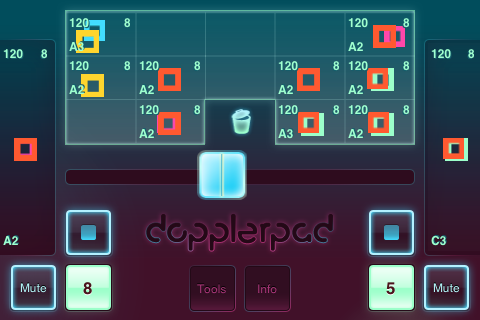
Mixer View
The Mixer provides the ability to crossfade, play, stop, mute and "beat cut" both touchpads. Save and load loops in this view.
Using the Crossfader
The Crossfader fades between the two touchpads. The touchpads play at equal volume when the Crossfader is centered. Slide the Crossfader to change the mix.
Tap anywhere on the Crossfader bar to jump to that position.
Controlling Loops from the Mixer
Play/Stop
Tap the Play button to start and stop the loop.
Mute
Hold the mute button to silence a touchpad.
Beat Cut

The Beat Cut Control displays the current beat of the loop. Hold the Beat Cut Control to continuously play the current beat. The loop continues from the current position when released.
Auto Sync
The playback of the two touchpads stays in beat sync as you load and play loops.
If the touchpads have different tempos, the sync is not retained.
Using the Loop Bank
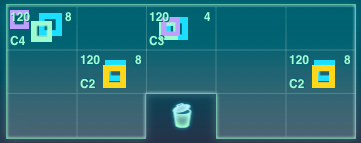
The Loop Bank saves and manages loops. Every loop is displayed by the colors and squares that are played on the touchpad. Saved loops also display the tempo, loop length, and starting key.
Saving Loops
Drag a loop from a touchpad on the side of the mixer to a cell in the Loop Bank to save it.
Loading Loops
Drag a loop from the Loop Bank to either touchpad to load it, play back, record, and modify as normal.
Duplicating Loops
Drag a loop to another cell to create a copy.
Dragging a loop to a cell occupied by another loop overwrites that loop.
Deleting Loops
Drag the loop from the bank or the touchpad to the trash can in the center of the screen to delete it.
Tools
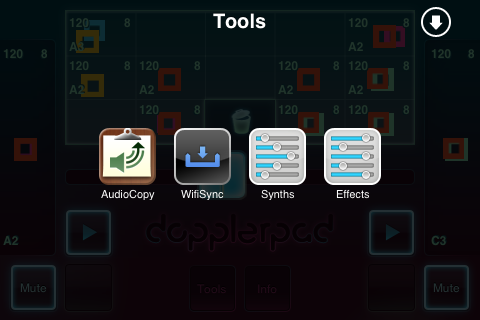
Accessible from the bottom of the mixer, there are several tools to enhance functionality. Tap the Tools button to browse available options.
AudioCopy
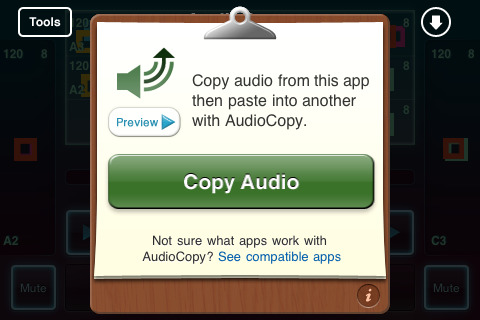
AudioCopy will copy audio from DopplerPad and prepare it for pasting into another compatible app. The output of the mixer is copied, meaning that the loops on both pads with the current crossfade setting will be copied.
If the Pads have different tempos, the slower of the two tempos will be recorded as the BPM of the copied loop. This can cause unexpected results when pasting, so note the tempos of your pads.
Preview
Press the preview button to audition the loop to be copied.
Compatible Apps
Tap "See compatible apps" or the info button to view a list of apps that are AudioCopy/AudioPaste enabled. New apps are being added all the time!
Wifi Sync
Make sure your iPhone and computer are connected to the same Wifi network. Press on the Tools button in the mixer screen, then tap the WifiSync button in the Tools menu.
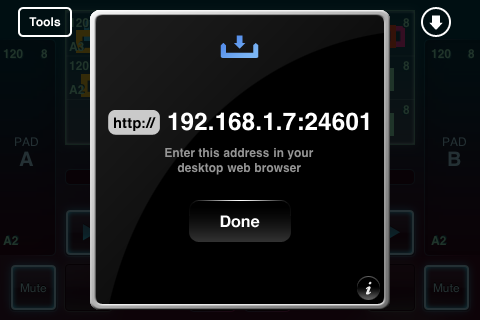
A black screen will appear with an IP address that looks something like http://192.168.0.101:24601.
At this point you can use a web browser to download your tracks as .wav files to be used in most desktop recording programs. Type the IP address into your browser address bar, and then approve the connection on your phone by tapping the OK button. The app should display a "Connected" message, and the web browser will refresh to reveal the mixer interface with each loaded loop as a downloadable .wav file. When finished, just tap the done button on the app and then exit the Tools window to return to the main app.
Synths
The Synths tool is an editor for creating and saving new, custom synth sounds for use with DopplerPad. While editing a synth, use the test pad on the left to hear what it sounds like.
Modifying existing sounds
To edit an existing factory sound, just select it from the initial list. Factory sounds cannot be replaced with changes; any edits made must be saved as a new custom sound.
Creating a new sound
To create a completely new synth sound, select a category and then tap "New."
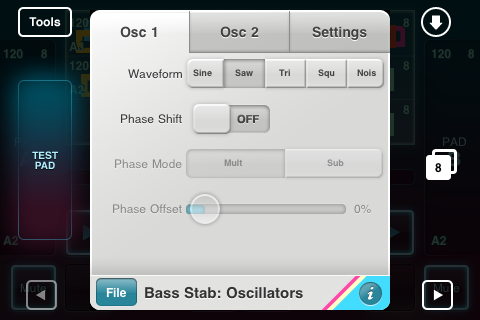
Oscillators
The DopplerPad synthesizer has at its core 2 oscillators which generate the basic sound of the synth. The Oscillators panel controls the basic parameters of these two oscillators. Oscillator 2 can be enabled or disabled altogether.
- Osc 1 and 2
- Waveform: Pick from 5 different waveform generators: Sine, Saw, Triangle, Square and Noise. Each has a distinct sound.
- Phase Shift: Enabling phase shift will create a duplicate waveform for the oscillator, allowing you to create more complex waveforms out of the existing one.
- Phase Mode: Sub will subtract the two waveforms from one another, while multi will multiply them with each other.
- Phase Offset: The distance between the two waveforms; more dramatic offset will cause more of a change in the resulting sound.
- Settings
- Octave Diff: Sets the octave of Osc 2.
- Freq Diff: Fine tunes the frequency (pitch) of Osc 2.
- Mix: Sets the mix between Osc 1 and Osc 2.
Amp Envelope
Amp envelope controls the basic amplitude (volume) over time. Amp envelope is also known as ADSR (Attack, Decay, Sustain, Release).
- Attack: The number of milliseconds (ms) it takes for the sound to reach full volume each time it's activated (longer attacks are ideal for pad-style synths).
- Decay: How quickly the sound falls to the sustain level after the attack peak.
- Sustain: The sustained (or constant) volume at which the sound remains after the decay; the sustain level lasts as long as the note is held down.
- Release: How quickly the sound fades out after the note is released.
Filter
There are two types of filter for any DopplerPad instrument. Low pass filters pass low frequency signals, attenuating (reduce the amplitude of) signals with frequencies higher than the cutoff filter you choose. High-pass filters do the opposite.
- Enabled: Turn the filter off and on.
- Filter Type: Choose high pass or low pass.
- Frequency: Sets the cutoff frequency of the filter. With low pass filter, signals above the selected frequency will be reduced. With high pass filter, signals below the selected frequency will be reduced.
- Q: Also known as resonance, Q affects the filter quality; setting a higher Q value will emphasize the frequencies around the set filter frequency.
Mod Envelope
Similar to Amp Envelope, Mod (modulation) Envelope determines how one of several selected parameters are modified over time.
- Enabled: Turn the envelope off and on.
- Destination: Select which parameter the envelope will affect.
- Invert: "Flips" the envelope for all parameters. For example, instead of fading from zero to peak, attack will fade from peak to zero.
- Attack: Sets the number of milliseconds (ms) it takes for the selected parameter to reach peak value each time it's activated.
- Decay: Sets how quickly the selected parameter falls to the sustain value after the attack peak.
- Sustain: Sets the sustained value of the selected parameter. The sustain value lasts as long as the note is held down.
- Release: Sets how quickly the selected parameter fades to zero after the note is released.
LFO
LFO stands for Low Frequency Oscillation. LFO allows you to set an oscillating modulation on a selected parameter.
- Enabled. Turn the LFO on and off.
- LFO Sync: If on, start the LFO over each time a note is triggered. If off, the LFO will continue oscillating whether or not you are playing a note.
- Destination: Select the parameter for the LFO to affect.
- Waveform: Select a waveform.
- Amount: Sets how dramatic of an effect the LFO has on the selected parameter.
- Beat Sync: When off, you can set the frequency of the oscillation in hz. When on, the LFO is synced to the current tempo.
- Frequency: Set how rapid the LFO is.
Mod Y
Mod Y lets you set how your finger movement on the Y-axis when playing on a pad will affect various parameters. Setting positive values means the closer to the top of the pad you move your finger, the greater the effect. Setting negative values means the closer to the top of the pad you move your finger, the lesser the effect.
- Oscillators
- FreqDelta: sets the difference between frequency/pitch from top to bottom.
- Phase Offset A: sets the extent to which Osc 1's phase offset is affected on the Y axis. Phase shift must be enabled for this to have any effect.
- Phase Offset B: sets the extent to which Osc 2's phase offset is affected on the Y axis. Osc 2 must be enabled along with its phase shift for this to have any effect.
- OSC Crossfade: Sets how much to affect the mix between the two main oscillators.
- Decay: Sets how much to modify the amplitude decay (from the Amp Envelope panel).
- Filter
- Filter Frequency: Sets how much to affect the Filter Frequency (from the filter panel).
- Filter Q: Sets how much to affect the Filter Q (from the filter panel).
- LFO
- LFO Amp: Sets how much to affect the LFO amount (from the LFO panel).
- LFO Frequency: Sets how much to affect the LFO Frequency (from the LFO panel).
Velocity
Similar to Mod Y, Velocity lets you set how tap velocity when playing on a pad will affect various parameters. Setting positive values means the harder you tap, the greater the effect. Setting negative values means harder you tap, the lessor the effect.
- Oscillators
- FreqDelta: sets the difference between frequency/pitch from top to bottom.
- Phase Offset A: sets the extent to which Osc 1's phase offset is affected by touch velocity. Phase shift must be enabled for this to have any effect.
- Phase Offset B: sets the extent to which Osc 2's phase offset is affected. Osc 2 must be enabled along with its phase shift for this to have any effect.
- OSC Crossfade: Sets how much to affect the mix between the two main oscillators.
- Filter
- Filter Frequency: Sets how much to affect the Filter Frequency (from the filter panel).
- Filter Q: Sets how much to affect the Filter Q (from the filter panel).
- LFO
- LFO Amp: Sets how much to affect the LFO amount (from the LFO panel).
- LFO Frequency: Sets how much to affect the LFO Frequency (from the LFO panel).
Meta Info
- Class: Sets the basic class (or category) of the selected instrument.
- Default Octave: sets the octave that will be used when this instrument is selected on a pad.
Saving sounds
In order to save a custom sound, tap the "File" button in the lower left of the Synths editor. Selecting "Save" will overwrite your current custom sound. For newly modified versions of built-in factory sounds, or for altogether new sounds, "Save As..." must be used to give the file a unique name. Any time a sound has not been saved when the editor is closed, an alert dialog will ask whether changes should be saved or not; any newly customized sound will need to be named and saved.
Effects
Effects are a handy way to modify existing or custom sounds and give them an added layer of complexity and richness. There are several built-in factory effects which can be modified and saved as unique new custom sounds, or new effects can be created altogether.

Delay
Enabling delay can add a certain amount of depth or space to your sound or give it an extended echo effect.
- Enabled: Turn the delay off and on.
- Beat Sync: Turning this on will sync the delay with the current tempo.
- Time: The amount of time between instances of the delay. When beat sync is on, timing is based on intervals relative to the current tempo. When beat sync is off, this is a freely sliding increment.
- Wet: The higher the wetness, the louder the delay effect will sound.
- Dry: The higher the dryness, the more you'll hear the original synth sound before the delay begins. A value of 1.00 will include the original sound at 100% -- anything less will decrease its prominence relative to the delay.
- Feedback: The degree to which the delay effect feeds back. The higher the feedback, the louder and more gradual the decay of the delay effect will be.
Delay Filter
There are two types of filter that can be applied. Low pass filters pass low frequency signals, attenuating (reduce the amplitude of) signals with frequencies higher than the cutoff filter you choose. High-pass filters do the opposite.
- Enabled: Turn the filter off and on.
- Filter Type: Choose high pass or low pass.
- Frequency: Sets the cutoff frequency of the filter. With low pass filter, signals above the selected frequency will be reduced. With high pass filter, signals below the selected frequency will be reduced.
- Q: Also known as resonance, Q affects the filter quality; setting a higher Q value will emphasize the frequencies around the set filter frequency.
Distortion
Distortion is an easy way to give any synth sound a more coarse, fuzzy quality.
- Enabled: Turn distortion off and on.
- Threshold: The degree to which distortion is applied to your sound. The lower the threshold, the less the original synth sound will come through the distortion.
Mod Y
Mod Y lets you set how your finger movement on the Y-axis when playing on a pad will affect various parameters. Setting positive values means the closer to the top of the pad you move your finger, the greater the effect. Setting negative values means the closer to the top of the pad you move your finger, the lesser the effect.
- Distortion
- Threshold: affects the amount of variation in threshold based on the Y axis of the touchpad.
- Delay
- Feedback: The higher the value, the more feedback tapping lower on the Y axis will generate.
- Wet: The higher the value, the more the delay will sound when tapping lower on the Y axis of the touchpad.